IED Assignments
- Instructor
- Mr. Jason Takamoto
- Term
- 2018-2019 School Term
- Department
- Career Technology Education
- Description
-
Chess Piece Voting has been completed
and the results are in...
Files
Upcoming Assignments

No upcoming assignments.
Past Assignments
Due:
Assignment
JigSaw Puzzle SolidWorks
- Drawing file for each JigSaw puzzle piece
- BOM required
- stapled together in order from list of BOM parts
Due:
Assignment
JigSaw Puzzle Design
- You will have an additional 30 minutes on this day to get signed off.
- You cannot get signed off after this time.
- Follow the constraints from the included document to best prepare your design to get signed off. (Must be signed off by the instructor before moving forward; minus 5 points if not followed)
Due:
Assignment
Subwoofer Enclosure
- Choose a subwoofer, NOT THE BOX!
- Document the manufacture, model, & size of the subwoofer.
- It's most important to find the recommended air volume specified by the subwoofer manufacture. (units usually listed as ft3)
- Once you know the volume, you can start to design your angled face enclosure.
Due:
Assignment
Locating Base
- Model object on SolidWorks using dimensional values from provided document.
- Use Hole Wizard for all holes!
- Save as Locating Base_XX, where XX are your initials of your first and last name
- FOR EXAMPLE: if your name is John Smith, your file name would look like this ==> Slotted Bracket_JS
- Make sure to save a copy of the file into your google drive or on your flash drive.
- Create a "Drawing" file (Sheet size C) and project front, top, side & isometric views.
- Be sure to place all dimensions on appropriate views following the 16 dimension rules.
- PUT YOUR NAME ON YOUR PAPER! (add a "note")
- Remember to edit the size of the file name in the title block.
- Save drawing file the same name as part file.
Print drawing file and turn in paper.
- FIRST select the correct printer! "HW-E107-M402".
- Remember to click "Page Setup", select "Scale to Fit", then select and "Landscape"
- Preview print file, click "Print" and the click "OK"
Due:
Assignment
Dial Calipers
- START NOTES ON THE NEXT BLANK PAGE.
- Follow the PowerPoint and take notes in your Engineering Notebook
Due:
Assignment
Game of Chess
- Following the instructions and constraints from the attached document.
Due:
Assignment
Puzzle Cube Project: SolidWorks
- Make sure you following the 16 dimensioning rules before printing your drawing files.
- Print a BOM file.
- Staple all pages together.
- BOM is first page, and parts for drawings are in order of how they are listed in BOM table.
- Get cubes from instructor!!
- MUST HAVE SANDWICH BAG to get cubes!
- NO BAG, NO CUBES!!
Due:
Assignment
Puzzle Cube Project: SolidWorks
- Model each of your puzzle parts on SolidWorks
- Be sure to create all parts in the same orientation as it sits in your Puzzle Cube.
- Create a drawing file for each puzzle piece and dimension following the 16 dimensioning rules.
- Create a BOM (assembled view, exploded view, ballooning, and BOM table)
Due:
Assignment
Puzzle Cube Project: Steps 5 - 7
DO NOT MAKE YOUR PUZZLE PIECES LOOK LIKE INDIVIDUAL CUBES.
- Choose your best option from the two
- Hand sketch a 2 to 1 multi-view drawing for each of the five puzzle parts of your chosen solution. (Done in your engineering notebook)
- An isometric 2 to 1 sketch (up1-over2, technique) of each puzzle part must be place next to the matching hand sketched multi-view drawing and colored to match original design.(Also done in your engineering notebook and signed off by the instructor before moving forward; minus 5 points if not followed)
Due:
Assignment
Puzzle Cube Project: Steps 1 - 4
- The entire project procedure is included below as an overview. Your teacher will guide you as to when you will complete each step.
- Study the Puzzle Cube Design Brief located below.
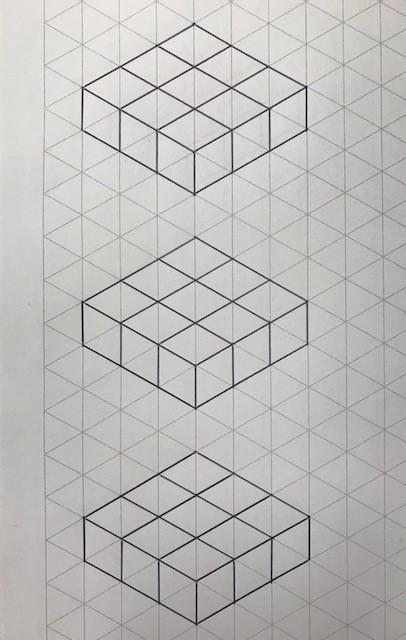
- Brainstorm and sketch on isometric grid paper possible puzzle part cube combinations for your cube. (Refer to layers template for setup)
- Create two different Puzzle Cube designs from your possible parts using provided isometric layers template. Note that the design brief that follows requires that each puzzle part contain at least four and no more than six hardwood cubes. For each design, neatly sketch and color code an isometric view of each of the five component parts and show how they fit together in the isometric view of the cube on isometric grid paper. See your teacher for an example. Again you will need a total of two (Must be signed off by the instructor before moving forward; minus 5 points if not followed)
Due:
Assignment
Slotted Bracket_XX
- Model object on SolidWorks using dimensional values from provided document.
- Use Hole Wizard for all holes!
- The slot can be done done with any method you choose.
- Save as Slotted Bracket_XX, where XX are your initials of your first and last name
- FOR EXAMPLE: if your name is John Smith, your file name would look like this ==> Slotted Bracket_JS
- Make sure to save a copy of the file into your google drive or on your flash drive.
- Create a "Drawing" file (Sheet size C) and project front, top, side & isometric views.
- Be sure to place all dimensions on appropriate views following the 16 dimension rules.
- PUT YOUR NAME ON YOUR PAPER! (add a "note")
- Remember to edit the size of the file name in the title block.
- Save drawing file the same name as part file.
Print drawing file and turn in paper.
- FIRST select the correct printer! "HW-E107-M402".
- Remember to click "Page Setup", select "Scale to Fit", then select and "Landscape"
- Preview print file, click "Print" and the click "OK"
Due:
Assignment
Maze Project - Laser Cutting
EVERYTHING due on this day by the end of the period!
- SolidWorks drawing files - drawings of the Floor, Walls, and Bill of Material
- Laser cut maze that has been glued together and your name written on the back.
- Notebook Check.
Due:
Assignment
Maze Project - SolidWorks
Now that you have your maze designed and sketched, you have to model it on SolidWorks.
- Model your parts on SolidWorks (2 files: Walls_XX and Floor_XX)
- You will need to have a drawing file for each. (Saved as the same EXACT NAME of each part files)
- You should dimension the overall height, width, and depth of each part.
- Additionally you will need to dimension the entrance & exit and the thickness of ONE of the wall on the "Walls_XX" drawing file .
Remember the naming format of SolidWorks files!! The "_XX" part are your initials
Due:
Assignment
Maze Project - Sketch
Each student is working on designing a maze. This is done in your Engineering notebook following the constraints and exception explain from the PowerPoint.
- This sketch must be signed off by the Instructor before moving forward with the project (This is done by using a date stamper)
Due:
Assignment
Due:
Assignment
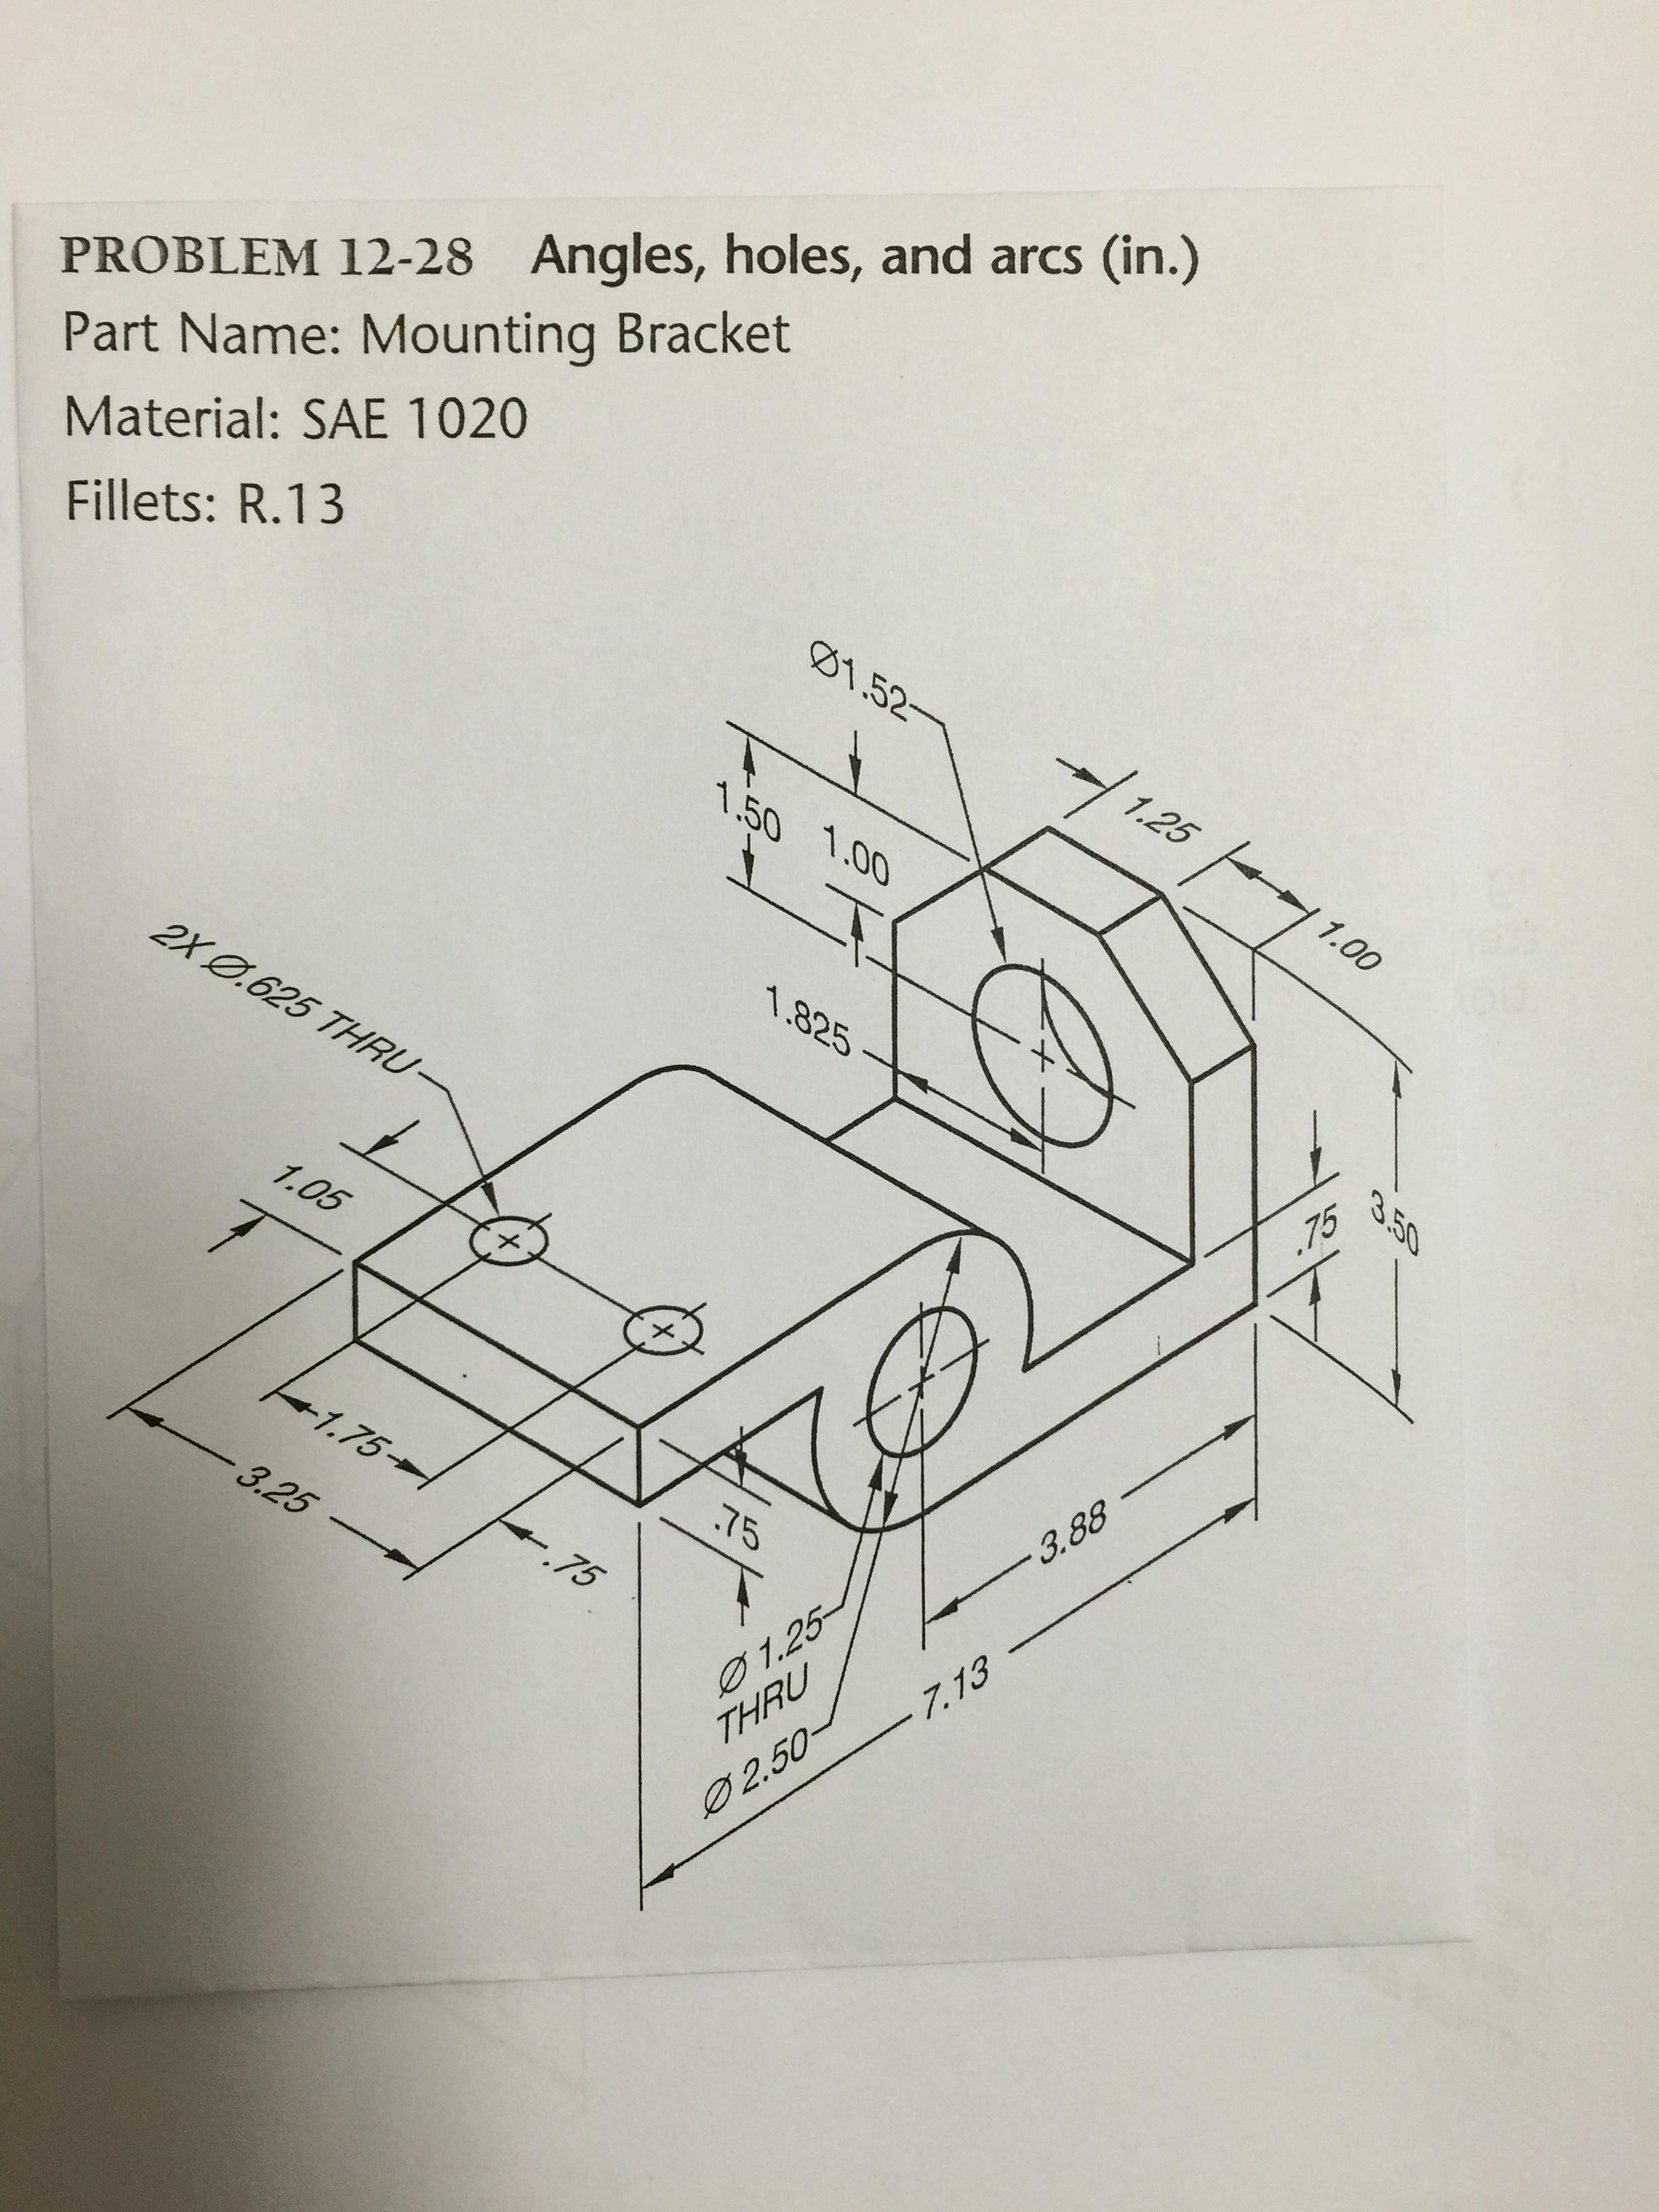
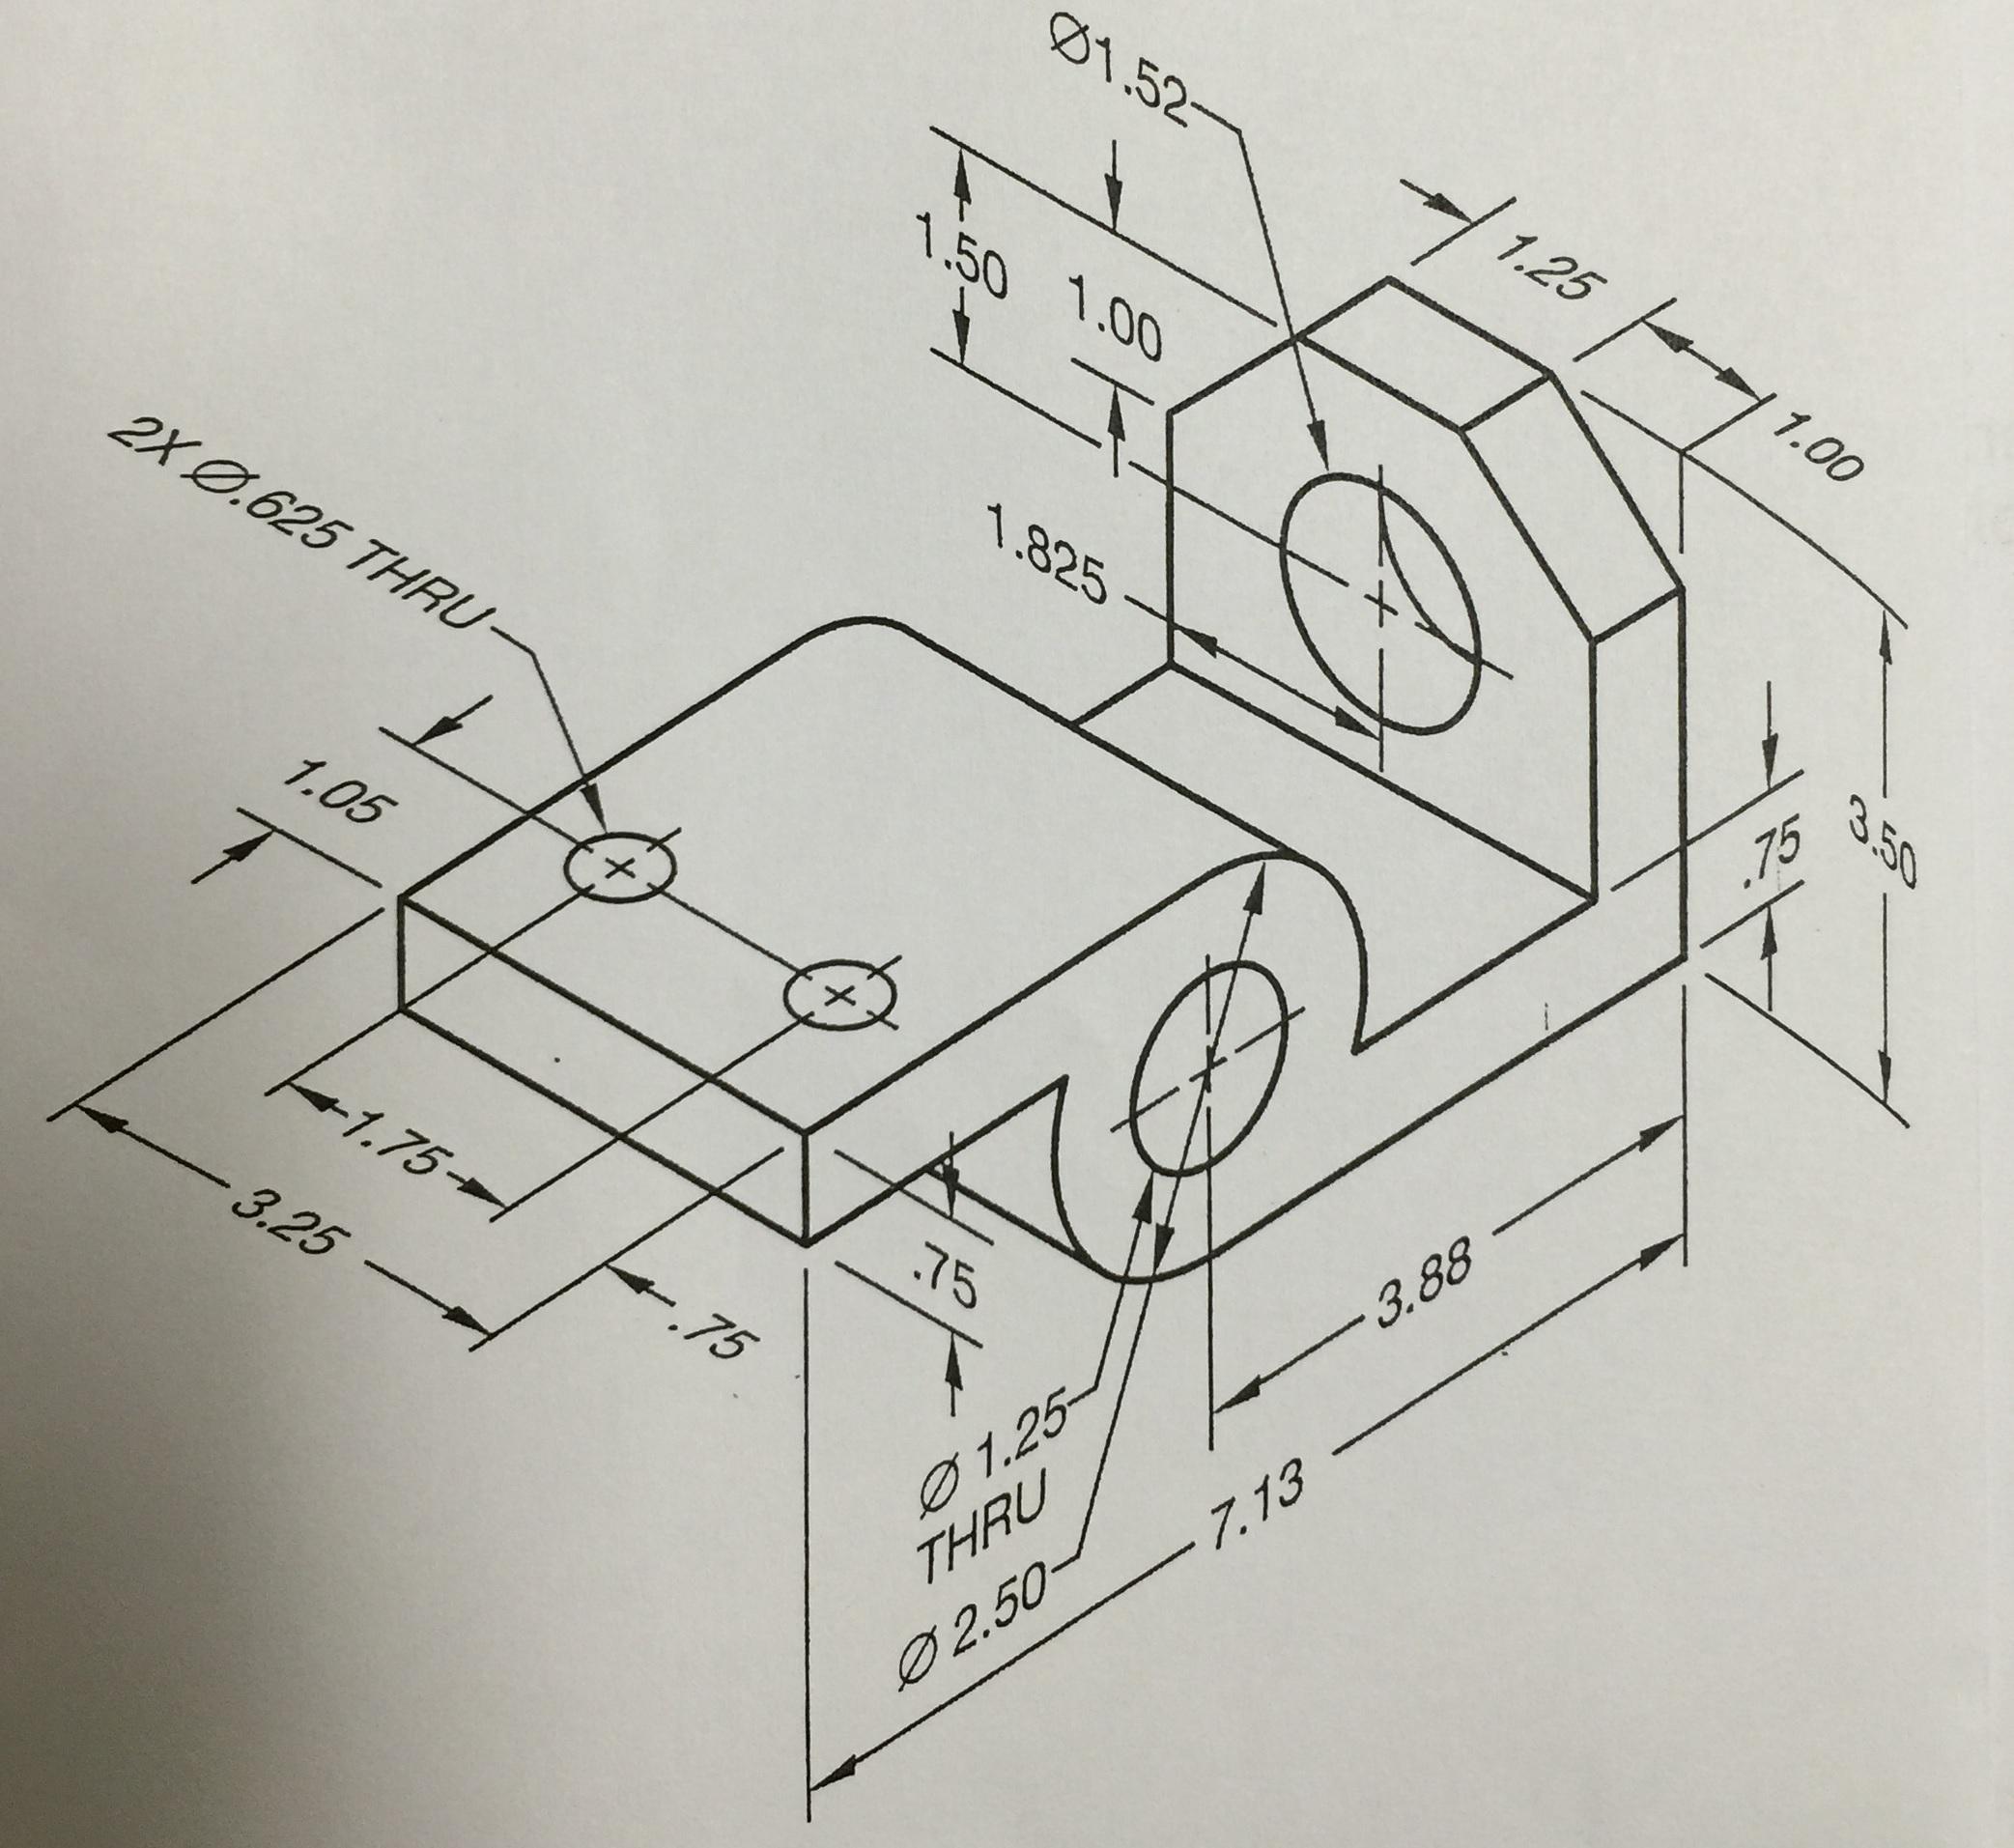
Mounting Bracket_XX
- Model object on SolidWorks using dimensional values from provided document.
- Use Hole Wizard for all holes!
- Save as Mounting Bracket_XX, where XX are your initials of your first and last name
- FOR EXAMPLE: if your name is John Smith, your file name would look like this ==> Mounting Bracket_JS
- Make sure to save a copy of the file into your google drive or on your flash drive.
- Create a "Drawing" file (Sheet size C) and project front, top, side & isometric views.
- Be sure to place all dimensions on appropriate views following the 16 dimension rules.
- PUT YOUR NAME ON YOUR PAPER! (add a "note")
- Save drawing file the same name as part file.
Print drawing file and turn in paper.
- First select the correct printer! "HW-E107-M402".
- Remember to click "Page Setup", select "Scale to Fit", then select and "Landscape"
- Preview print file, click "Print" and the click "OK"
Due:
Assignment
Dial Bracket_XX
- Save as Dial Bracket_XX, where XX are your initials of your first and last name
- FOR EXAMPLE: if your name is John Smith, your file name would look like this ==> Dial Bracket_JS
- Make sure to save a copy of the file into your google drive or on your flash drive.
Due:
Assignment
Bracket_XX
- Save as Bracket_XX, where XX are your initials of your first and last name
- FOR EXAMPLE: if your name is John Smith, your file name would look like this ==> Bracket_JS
- Make sure to save a copy of the file into your google drive or on your flash drive.
Due:
Assignment
Final
- Each square is 0.125"
- Name each object your initials underscore object number
- EXAMPLE: John Smith, object #7 ==> JS_7
- Create a new folder and rename to your name
- Save all files into that folder
- Compress folder (Zipped)
- Send an email to the following address:
MAKE SURE TO ATTACH THE COMPRESSED FOLDER.
Due:
Assignment
SolidWorks Buddies
1st year students
- Model any 8 of the 12 objects (buddys) from the handout.
2nd year students
- Model ALL 12 objects (buddys) from the handout.
-
Due:
Assignment
SolidWorks PowerPoint
- These are basic steps to completing the Extrude Boss/Base feature
Due:
Assignment
Design Process PowerPoint
IMPORTANT
Draw/sketch 6 step design process chart on its OWN PAGE!
Due:
Assignment
Engineering Notebook Setup PowerPoint
- Each square is 0.125"
- Name each object your initials underscore object number
- EXAMPLE: John Smith, object #7 ==> JS_7
- Create a new folder and rename to your name
- Save all files into that folder
- Compress folder (Zipped)
- Send an email to the following address: MAKE SURE TO ATTACH THE COMPRESSED FOLDER.
Due:
Assignment
Engineering Notebook Setup PowerPoint
Leave the first 3 pages in the front of your Engineering Notebook blank. These pages will be used to construct a table of contents.
- START NOTES ON THE FIRST BLANK PAGE, ON RIGHT HAND SIDE OF BOOK
- Follow the PowerPoint and take notes in your Engineering Notebook (after table of contents)